Tuesday, 26 November 2019

P3 - Develop Pre-Production Materials

This is the complete shooting script for my music video:


This is the complete storyboard for my music video:


Mise-en-scène -
Within the frame will almost always be a band member or a close up of an instrument, this is because of the genre convention which focuses on the artists playing the music above anything else, which will satisfy the audiences desires as its what they expect to see in a music video of this genre. I have also chosen the location of shed to film in, not only because it is dry and easily accessible but because   it is representative of the lack of care which the indie-rock genre has, so the setting involves from this idea of the lack of care. The audience will be able to see the band members wearing Hawaiian shirts which they may believe to be a bit strange, however the audiences thinking about this irregularity is what I want as it means they are thinking about my band, which therefore generates a larger interest in my band and creates iconography for them.

Reece of Location -
This is an establishing shot of my filming location, showing what the property looks like from far away and how we will see the property when the actors are entering the shed.


This is what the entrance to the premises looks like:


This is what the interior of the premises looks like and the space I will have to work with when filming my music video, however in the photos it is not yet dressed for filming my production:


Risk Assessment -
This is the risk assessment I created in order to identify any potential risks that may arise when filming my production and take action to reduce the possibility of these risks having a harmful effect on the actors or myself.


 Production Schedule -
Actor Consent Forms -


Property Release Form -


Call Sheet for my Production -


Wednesday, 20 November 2019

3 - Point Lighting

3-Point Lighting is a standard lighting technique used in visual media such as, film, still photography, and animation. It is a simple system that involves 3 separate lights: Key light, Fill Light and Back Light.


Key Light:
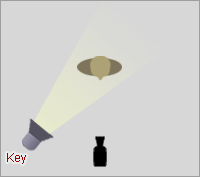
The key light is the main light and it is usually the strongest light and has most influence on how the scene looks. It is placed to one side of the camera/subject so this side is well lit and the other side has some shadow, to show the depth of the scene better.

Key Light


Fill Light:
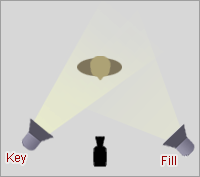
This is the secondary light and is placed on the opposite side of the key light, we use this light to fill the shadows that are created by the key light. The fill light will usually be softer than the key light and less bright, to do this we can simply move the fill light further away from the scene.

Key and Fill

Back Light:
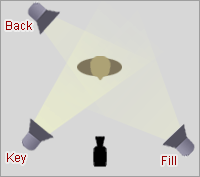
The back light is placed behind the rear of the subject and lights it from the rear. Instead of providing direct lighting to the subject like, the key and fill light, the back lights purpose is to provide definition and subtle highlight around the subject's outlines. This helps create and 3D feel to the image which will interest the audience more.

Key, Fill and Back


Lighting Challenge

This is my attempt at the lighting challenge, where we used lights to practise some cinematic lighting conditions which will help our music video look professional.


I tried to use some colour gels as practise for my music video, the colour I chose was a red gel and used this as a flat light, which just put my subject in a completely red tint.
I also used a 2 point light set up with one white light and one yellow light on each half of the face to create a half and half colour change on the face.

Saturday, 16 November 2019

180 Degree Rule - Sequence Challenge

This is my attempt at the sequence challenge we underwent, practising following the 180 degree rule so that our character positions and movements do not seem out of the ordinary to the audience of disorientating.


The 180-degree rue is a cinematography guideline which states that two characters in a scene should maintain the the same left / right relationship to one other when on screen. When the camera passes over the invisible axis connecting the two subjects, it is called crossing the line and the shot becomes what is called a reverse angle, this will most likely disorientate the audience and will not be pleasing to watch.

Monday, 11 November 2019

How to File using a DSLR Camera

To film we will be using the Sony Alpha 8 Camera.

Filming mode looks like a small film board.
Things to do with the camera to get a cinematic looking film:

Aperture -
How much light is let onto sensor, how big the camera hole is therefore how much light is let in.

Smaller F Stop - lens more open, more light.
Larger F Stop - lens less open, less light.


Depth of field focus 

Smaller F Stop (wide aperture) - shallow depth of field.
Large F Stop (small aperture) - long depth of field.


Frames per second of video (FPS)


FPS - shutter speed should be twice frame rate. E.g: Shutter Speed 1/50. FPS 25FPS.
We are filming in 25FPS for our music video. FPS is the number of still images played per second.
Use shutter priority video mode.

To change FPS toggle onto the S mode and then use the rolling thing behind the right side of the camera grip.

ISO

ISO - changes on how sensitive camera sensor is to light.
High ISO - more sensitive. Evening when light fading.
Higher ISO - gets more noise. Always use lowest ISO possible.


White Balance

White Balance (WB) - different colours of light.
Daylight - blue.
Artificial - Warm.
Set WB for different climates.


Zoom

Always below 18mm zoom for best quality, move camera instead of zoom. 

Tuesday, 5 November 2019

P2 - Create Sample Materials

This is the first page of storyboard :


This is the first page of my shot script:

This is my very first draft on my initial ideas, where I annotated around the lyrics of the song I plan to use in my music video:


Monday, 4 November 2019

Composition Challenge

This is my first attempt at a composition challenge using action figures and dialogue to try create a flowing composition so it appears that the characters are having a conversation, following the dialogue. The task was also to respect the rule of thirds, consider headroom  and looking room and also to vary my shot types.

The audio I used was from Batman the Dark Knight and is the interrogation scene between the Joker and Commissioner Gordan.

 First Attempt:


The feedback I received from my teacher and peers was, and the improvements I made were:

  - To fade to black at the end of the clip
  - To fade the audio out so it finishes cleaner
  - To add more headroom and to use the rule of thirds more effectively, to do this I simply went through my clips and cropped them using Final Cut Pro X.
  - To cut the clips to the audio better so that the visuals flow better with the audio, to do this I extended some clips so that he cuts fit better with the audio.
  - I also added some close ups for dramatic technique when the audio implied so.

Second Attempt:


P1 - Produce a Proposal

Original P1 Proposal - 
This is my first version of my P1 proposal before receiving feedback from my teacher. The feedback I received from my teacher was that my idea was very solid however to improve I need to take a look and expand on my ideas and add more detail, and that it was essential that I decide upon my narrative element.


Improved P1 Proposal -
This is the improved version of my P1 Proposal after listening to my teachers feedback and then acting on it to improve my proposal to the best of my ability, and have added more detail and finalised on a narrative element.


Presentation of Proposal -
This is my live presentation of my proposal to my teacher, going through my powerpoint and explaining more details about my music video.


P4 - Print Media Poster